SSH and SCP are great, but one of the pains of using these programs is the constant need to type in a password to logon to different servers. Wouldn't it be nice to not have to enter a password everytime you logged onto a server or had a script run? As well, wouldn't it be even better to have those processes still be secure? Of course! So in order to free your life of passwords, I will now show you pubkey authentication.
In the interest of full disclosure, I got a good bit of the information for this post from Security Focus, but I felt that the way they organized the details was a bit confusing. Hence, I've reworked their original example to something a more understandable. Here is the link to that original article:
http://www.securityfocus.com/infocus/1810
Added 3/1/2008
For a more general understanding of how SSH works with public key encryption, read the following article:
http://www.securityfocus.com/infocus/1806
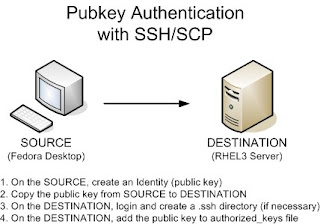
In order for pubkey authentication to work, you will need to create a public key on your source machine and setup an authorized_keys file on the destination server. The source machine will be the server where you are logging in FROM. The destination server is where you are logging in TO. For instance, I like to run a script on my Fedora desktop that gathers network information FROM my RHEL3 server. So my source is the Fedora desktop and the destination is my RHEL3 server.
Here's the picture:

There are four steps to setting up pubkey authentication:
1. On the source, create an Identity (a public key)
2. Copy the public key from the source to the destination
3. On the destination, login and create a .ssh directory (if necessary)
4. On the destination, add the public key to authorized_keys file
So let's begin.
1. On the source machine, create an Identity (a public key)
a. Type ssh-keygen -t rsa as below. You can choose to enter a passphrase or not:
FedoraDesktop$ ssh-keygen -t rsa
Generating public/private rsa key pair.
Enter file in which to save the key (/home/cacasodo/.ssh/id_rsa):
Enter passphrase (empty for no passphrase): (enter passphrase)
Enter same passphrase again: (enter passphrase)
Your identification has been saved in /home/cacasodo/.ssh/id_rsa.
Your public key has been saved in /home/cacasodo/.ssh/id_rsa.pub.
The key fingerprint is:
74:9b:69:24:4a:44:3f:a4:be:46:23:47:19:f7:dc cacasodo@FedoraDesktop
b. Verify that one public (*.pub) and one private file exists by changing to your users's .ssh directory and listing out the files:
FedoraDesktop$ cd $HOME/.ssh
FedoraDesktop$ ls -l
-rw------- 1 cacasodo cacasodo 883 Jan 21 11:52 id_rsa
-rw-r--r-- 1 cacasodo cacasodo 223 Jan 21 11:52 id_rsa.pub
c. Finally, check the contents of both files:
FedoraDesktop$ cat id_rsa
-----BEGIN RSA PRIVATE KEY----- jK2TIwbHtE7GoP/Za3NTZJm2Ozviz8+PHPIEyyt9/kzT0+yo3KmgsstlqwIBIwKB XdBh42izEWsWpXf9t4So0upV1DEcjq8CQQDEKGAzNdgzOoIozE3Z3thIjrmkimXM J/Y3xQJBAMEqZ6syYX/+uRt+any1LADRebCq6UA076Sv1dmQ5HMfPbPuU9d3yOqV j0Fn2H68bX8KkGBzGhhuLmbrgRqr3+SPM/frUj3UyYxns5rnGspRkGB3AkALCbzH 9EAV8Uxn+Jhe5cgAC/hTPPdiwTJD7MpkNCpPuKRwrohytmNAmtIpKipAf0LS61np MIICWgIBAAKBgQCc+1oixZ/g84gpZH0NeI+CvVoY5O0FOCSpFCbhUGJigQ6VeKI5 gpOlDztpJ1Rc+KmfZ2qMaftwwnLmefhk1wPcvfZvvLjfdmHY5/LFgDujLuL2Pv+F 7tBjlyX9e9JfXZau2o8uhBkMbb3ZqYlbUuuoCAnUtL5uZUiiHM0BAtnGAd6epAYE gBHw1xnqsy+mzbuWdLEVF7crlUSsctwGapb6/SEQgEXFm0RITQ3jCY808NjRS3hW Z+uCCO8GGUsn2bZpcGXa5vZzACvZL8epJoMgQ4D0T50rAkEA0AvK4PsMF02Rzi4E mXgzd1yCa030LYR/AkApG1KT//9gju6QCXlWL6ckZg/QoyglW5myHmfPR8tbz+54
/lj06BtBA9iag5+x+caV7qKth1NPBbbUF8Sbs/WI5NYweNoG8dNY2e0JRzLamAUk
59ssjBG/a4ZXNn32n78DO0i6zVV5vwf8rv2sf
-----END RSA PRIVATE KEY-----
FedoraDesktop$ cat id_rsa.pub
ssh-rsa aIsWf4POIKWR9DXiPgr1aGOTtBTgkqRQm4VBiYoEOlXiiOYKTpQ87aSd
B3NzaC1yc2EAAAABIwAAAcMJy5nn4ZNcD3L32b7y433Zh2IEAnPtAAAAUXPipn
2dqjGn7OfyxYA7oy7i9j7/hYytkyMGx7ROxqD/2WtzU2SZtjs74s/PjxzyBMsr ff5M09PsqNypoLLLZas= cacasodo@FedoraDesktop
2. Copy the public key from the source to the destination
a. This one is fairly easy. We'll go ahead and scp the public key file from the source to the destination as below:
FedoraDesktop$ cd $HOME/.ssh
FedoraDesktop$ scp id_rsa.pub rhel3server:id_rsa_FedoraDesktop.pub
cacasodo@rhel3server's password: (enter password)
The scp command above copies the public key to the destination server with a new filename, id_rsa_FedoraDesktop.pub
3. On the destination, login and create a .ssh directory (if necessary)
a. Login via ssh
FedoraDesktop$ ssh rhel3server
cacasodo@rhel3server's password: (enter password)
b. If it does not exist, follow the commands below to make a .ssh directory. Oh, don't forget the "." in front of the ssh!
rhel3server$ mkdir .ssh
rhel3server$ chmod 700 .ssh
rhel3server$ cd .ssh
4. On the destination, add the public key to authorized_keys file
a. We will use the concatenate (>>) redirector to add our source machine's public key to the authorized_keys file on the destination server.
rhel3server$ cat ../id_rsa_FedoraDesktop.pub >> authorized_keys
b. Let's verify the file:
rhel3server$ cat authorized_keys
ssh-rsa n7OfyxYA7oy7i9j7/hYytkyMGx7ROxqD/2WtzU2SZtjs74s/PjxzyBMsr 3NzaC1yc2EAAAABIwAAAcMJy5nn4ZNcD3L32b7y433Zh2IEAnPt f4POIKWR9DXiPgr1aGOTtBTgkqRQm4VBiYoEOlXiiOYKTpQ87aSdUXPipn
M09PsqNypoLLLZas= cacasodo@FedoraDesktop
c. And make sure to lock down the file with tighter permissions:
rhel3server$ chmod 600 authorized_keys
d. OK! So now, the big test is to try and login from your source server to the destination server. You should no longer need to enter a password!
FedoraDesktop$ ssh rhel3server
rhel3server$
We're in! Now you don't have to enter your ssh password at the prompt any longer! Hoo-ah!
No comments:
Post a Comment